Few things smell like home other than the warmth and aroma of fresh bread. Making homemade bread is a meditative process that combines accuracy with imagination into a one-time event. Made-from-scratch bread gives you total control over tastes, textures, and ingredients, unlike store-bought loaves. Whether you’re making a traditional artisan loaf or experimenting with herbs and cheeses, every action brings you one step towards a loaf that is especially yours. The beauty of breadmaking is in its adaptability for those motivated by a crusty baguette or a pillowy brioche. The trip becomes as fulfilling as the destination as you refine the process. With a few basic ingredients, correct techniques, and lots of patience, you can create a masterwork from a basic dough that tells its own story.
Knowledge of Dough Formation’s Science
Making bread starts far ahead of the first kneading. Though each ingredient has a specific function in producing the ideal loaf, flour, water, yeast, and salt seem basic. Flour offers the framework; its proteins, hydrated, create gluten strands. By trapping gases, this gluten network helps the bread to have a chewy texture and helps the dough to rise. Water activates these proteins, but its temperature is quite important; cold water slows yeast activity, while too hot water can kill it, so stopping fermentation. During fermentation, yeast transforms sugars into carbon dioxide and alcohol, driving the rise of bread. Though sometimes underappreciated, salt improves taste and strengthens gluten. Together, these components create a dough that changes from a sticky mass into a smooth, elastic ball during mixing.
Developing the Art of Proofing
The phase where the dough rises—proofing— is where science meets patience. The dough needs time to relax and let the yeast do its magic once it has been worked. This stage develops flavors, not only volume. Ideally, between 75°F and 80°F, find a warm, draft-free area for your dough. Should your kitchen run cool, a preheated oven is turned off, or a proofing box provides the perfect surroundings. The dough should basically double in size during proofing. Bread that has been underproofed is dense, while bread that has been over proofed may collapse. The “poke test” evaluates readiness—softly press the dough with a finger. If it comes back slowly, it’s ready for the next step.


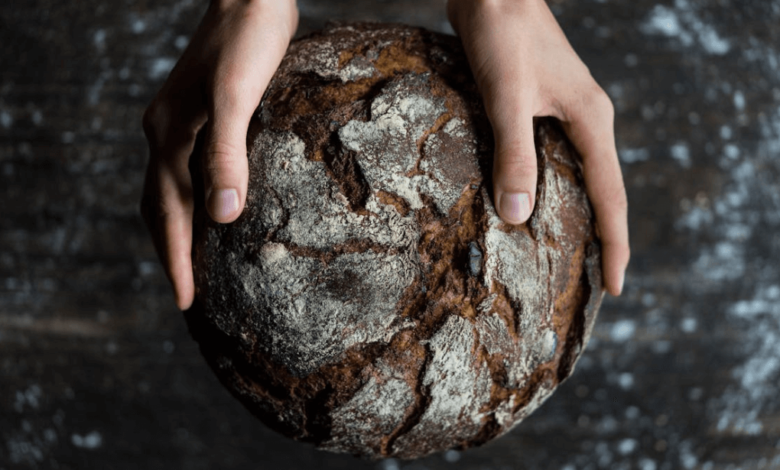
Shapes and Scoring
Turning a rising dough into a loaf calls for careful form-fitting. Good shaping guarantees consistent baking and a balanced texture. First, gently press out air bubbles without overhandling to depress the dough. Shape it then into the boule, batard, or braid you want. To avoid sticking, use a floured surface, but avoid overflowing since this will dry out the dough. Scoring directs the bread’s expansion during baking and not only serves decoration purposes. A bread lame or a sharp blade produces deliberate slashes, allowing steam to escape. The depth and angle of every cut affects the final look of the loaf. Searching for “fresh baguettes near me” will provide you with inspiration and ideas for your own brilliant bread.
The Baker’s Method
Making bread is a time, moisture, and heat balance. Making sure your oven is preheated guarantees consistent baking from the moment your dough gets in. A good crust depends on hot, humid surroundings. To get this, mist the inside before baking or set a pan of water at the bottom of the oven. This steam postpones crust development so the dough can expand completely before setting. The kind of bread controls the baking temperature. Start at a high heat—about 450°F—for the first blast of oven spring, then lower the temperature for the rest of the bake for rustic loaves. To guarantee the bread’s internal temperature reaches at least 190°F for soft loaves or 205°F for crustier options, use a thermometer. To retain the loaf’s texture and structure, let it cool on a wire rack, then cut.
Improving Taste Using Fermentation Methods
A deeper taste comes from fermenting bread beyond the basics using techniques like autolyze or cold fermentation. First, mix flour and water, the autolyze process, then let it rest. This stage increases the extensibility of the dough and develops gluten. Later on, adding yeast and salt produces a stronger structure and smoother texture. By slowing yeast activity, cold fermentation—where the dough proofs overnight in the refrigerator—Enzymes can break down starches into sugars over a long period, generating complicated tastes. The end effect is a loaf with a faintly sourdough-like tangy profile.
Conclusion
Made-from-scratch bread celebrates transformation and accuracy rather than merely following a formula. Every stage, from the first mix to the last crust, helps a loaf show care and workmanship. Learning this process makes one feel successful and provides an unlimited canvas for artistic expression. A well-baked loaf is an experience to be appreciated rather than only food.